

Tie-dye is a very common design choice for several diaper companies, and we here at Lalabye Baby like to try to set our choices apart from other brands, so we have no plans to print a tie-dye diaper. However, when some of our customers in our chat group asked about a tie-dye diaper, a light-bulb went off.

I had bought a tie-dye kit last summer with good intentions to use it on a bunch of toddler shirts that had developed stains. Clearly, that didn’t happen, because here I am this summer going, “Oh yeah, I still haven’t tie dyed…I should probably use that kit…”. So I thought I’d attempt to tie-dye one of my Mary’s Little Lamb diaper shells. After doing some research, I discovered that often they don’t turn out very vibrant. And after my first attempt, I totally see why people have reported that.
DIY Dye Cloth Diaper Shells!

I used a basic tie-dye kit bought off of Amazon (also available at craft stores like Hobby Lobby) and followed the directions for shirts with the diaper shell.

I soaked the shell in the soda ash water mixture with the t-shirts for 20 minutes. Soda ash (the active ingredient in washing soda) is used to activate and set dye in fibers.

I wrung out the shell, twisted it into a spiral shape, then secured it with rubber bands.


I applied the dye.

Then, I wrapped up the diaper in a bag and left it overnight to process.


After setting for 26 hours, the diaper still looked like this when I took it out of the bag.

However, once I rinsed it with the garden hose…


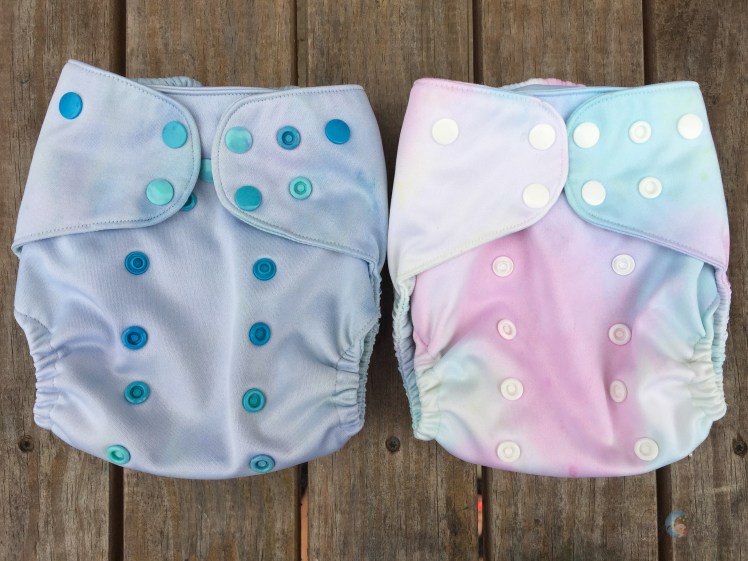
…most of the dye came out, leaving me with a very pretty pastel tie-dye.


It’s not at all what I was hoping for, but it’s still very pretty. Rinse, wring, rinse, repeat until little to no dye is present in the water coming out of the diaper. Then wash and dry as usual.


It turned out as a tie-dye almost reminiscent of part of our Spring Edition color line- Hush Little Baby, Little Miss Muffet, and a very pale version of Little Chick.

I even tried a different dye (made specifically for polyester) and different dye method (ice dying), but the results were not vibrant either.


To ice dye, you set your diaper on top of a cooling rack/drying rack over-top of a bucket/basin and either lay it flat or scrunch/twist as you please…

…cover it with ice…

…then use dye powder and sprinkle it directly on top of the ice. (***DO NOT DO THIS ON A WINDY DAY OR WITH CHILDREN PRESENT- the dye in powdered form is not great for inhaling and is very very potent, and little kids would be right at eye level with the project- not a good combo.***) The idea is that the dye trickles down and off the item, creating a water color tie-dye effect.

Let the ice melt…

…then store the diaper in a ziplock bag (or reusable grocery bag) for 24-26 hours.

Rinse, wring, rinse, repeat until little to no dye is present in the water coming out of the diaper.


Then wash and dry as usual. Once you’ve done this, you’ll see the true remains of the dye.


As you can see, the color is a little darker in some places, but I think because the dye can’t melt and flow through the fabric (because it’s laminated polyester) the “tie-dye” look doesn’t show up as prominently using the ice dye method. I even used a dye that was formulated for polyester, but their dying method recommended was boiling- something you SHOULD NOT do with cloth diaper shells (you’ll melt them/ruin them/delaminate them). Other “setting” methods included other forms of high heat (such as ironing) which also should be avoided unless you want to burn/melt your kid’s diapers!

Cotton (as it is most porous) will react best to absorbing dyes (giving vibrant results as seen in the onesie above where I used the same dye), and synthetic fabrics like polyester (less porous) will not absorb the dyes as well. This is the reason why diaper shells made of TPU (thermoplastic polyurathane) and PUL (polyurathane laminate) do not tie-dye vibrantly-the fabric isn’t porous enough to absorb the dye. This is a wonderful thing for cloth diapers because that fabric choice (by design) makes the diapers stain resistant and easy to clean to remove stains– a very good thing when you’re dealing with an item of clothing that is constantly soiled with bodily fluids. However, it’s NOT so wonderful a thing when you’re trying to make the diaper shell change colors on purpose!
So, does it work?
Mostly. The results will not be as vibrant as if you are using cotton or cotton blend clothing items, but it does work to a certain extent. You can always find dye kits at your local craft store and try it out.

Tips for Success:
–Simplify your dye choices– using one or two colors will look better than a lot! (Too many colors and you end up with muddy brown…)
–Do this project outside on a calm, clear day (little to no wind) when it is not too hot or too cold outside. (My 8 month pregnant self was sweating to death sitting outside getting this done!)
–Wear clothing that you do not care about.
–Get ALL your supplies out before you begin so that you’re not trying to run in and out of the house with dye on your hands or clothing or feet.
–Leave the items in bags outside to process somewhere in the shade and protected from the elements where you’re not going to mind if dye seeps through underneath them.
–Dye shirts or other clothing items (baby blankets, onesies, etc) at the same time.
–Have fun with it!

Another Option: Fabric Markers
One of our customers, Kallie G., shared with us a different way to go about creating a tie-dye look on diaper shells using fabric markers. (Thanks, Kallie!)

“[Tulip Markers are] the specific markers I’ve been using for all my cloth diaper projects.I found that they do fade somewhat in the first wash or two, but then keep their color well through subsequent washes. I usually go back and recolor any area that faded more than I’d like after the first wash and then ‘prep’ again. Each [brand] seems to have its pros and cons. Some bleed more but fade less or visa versa. Some are better for details or have more color variety. It’s really a personal choice depending on what you want to draw with the markers. Just make sure you are using fabric markers.”

“It’s recommended to color [freshly washed] diapers to make sure you are working on a good clean surface and oils from having been washed with new natural inserts, etc.”

“For tie-dye: if someone wants to recreate something, they’ll want to keep scale in mind. I looked for images of tie-dyed onesies because I knew the scale was on par already with the size of a diaper, so it worked really well to try to recreate ones I liked without too much adjusting in my mind. Also, depending on the color of the diaper you are working with, you can see through the PUL sometimes. So if someone wants to draw something on a white [diaper shell], for instance, they could put a black and white copy on paper in the pocket area and trace it on the outside of the diaper instead of having to free hand it.”

“When you start coloring, work with a light hand and slowly until you get a feel for the flow of the ink from the markers you are working with. Different brands of diapers have different textures to their PUL [or TPU in Lalabye’s case] so some bleed less and others more, even with the same markers…I just colored and blended like I would with colored pencils [using Tulip fabric markers]. I was actually pleasantly surprised that they don’t bleed at all on Lalabye TPU, which makes them very easy to control, but requires quite a few passes to really saturate the color.“

“To get colors to run together more, layer while [the marker ink is still] wet and expect them to kind of bleed together a bit. If you want to limit bleeding, let colors dry before adding another color next to it. Also, work top to bottom (and if you’re right handed, left to right; vice versa if left handed). It helps prevent smudging wet ink with your hand.”

“It is common for ink to come through stitching [as seen here]. As long as you expect it if you are planning to color both the tummy panel and the outer, you can incorporate it into your design, so its no big deal.”

“Once you have finished coloring, you’ll need to set the colors before washing. You want to let it air dry at least 24 hours, then throw in the dryer to tumble dry or dry on low heat. Its generally recommended to do so for approx. 30 min. You’ll want to dry it alone or the marker colors can transfer to other items because they haven’t been set yet. Skipping this step could result in excessive fading or bleeding in the wash. Once it is done drying, you’ll want to wash once prior to wearing. It is possible you may still have some mild bleeding / transfer in the first wash, so you may want to wash with a color catcher or at least with similar colors.”

Have fun! Have a great time trying out DIY Dye projects, and be sure to share your successes with us in chat!
***Please remember that any modifications made to your Lalabye Baby cloth diapers does void your limited warranty.***

I never thought about dying any of my diapers…although my boys and I tie dyed shirts this week for Easter and it just might become a new tradition.
LikeLike
Ahhh. Love how that became a pastel rainbow !!!
LikeLike
Ahhh. Love how that became a pastel rainbow !!! Stunning
LikeLike